
The ScanSensor program performs plotting of data that has been stored in the Instrument Description File System (IDFS) format. The IDFS format is a data storage format that is designed to be general enough to handle the majority of scientific data sets. These data sets include raw telemetry, processed data, simulation data and theoretical data. IDFS data sources are defined as either scalar instruments or vector instruments. A scalar instrument returns singular data quantities that are dependent only upon time and position. A vector instrument returns one-dimensional data quantities that have a functional dependence on a single variable, which in IDFS terminology is called the scanning variable.
ScanSensor performs the plotting of spectral quantities for each IDFS sensor at each of the bin partitions utilized by the scanning variable for the selected IDFS data source(s). The data is displayed in three dimensions: sensor number (x-axis), scan variable (y-axis) and intensity (z-variable). The z-axis or intensity variable can be any of the available units defined for the first IDFS data source selected. The IDFS format performs a real-time conversion of telemetry data into physical units as the data is accessed. This allows for the refinement of calibration factors and processing algorithms without having to reprocess the original data set. Since the y-axis is defined as the scan variable, the ScanSensor program does not allow the selection of scalar instruments. If a scalar source is identified, an error message is displayed to the user and the user must either modify or delete the scalar IDFS data source selected.
The ScanSensor program has the ability to display data from multiple IDFS data sources at the same time, each in a separate plot box. For the ScanSensor application, the first IDFS data source selected on the list of IDFS data sources to be processed is flagged as the "controller". This data source is used to: (1) control the time periods for which data is to be acquired per page, (2) determine which unit will be utilized for the scan variable (y-axis), (3) determine which unit will be utilized for the intensity variable (z-axis), (4) define the binning scheme that is to be utilized to gather the data for all IDFS data sources, and (5) define the scaling that will be utilized for the x-y axes pair for all plot boxes and for the color bar.
Although multiple IDFS data sources may be selected, there are some restrictions imposed by the ScanSensor application. All selected data sources must define the same number of IDFS sensors, which is specified in the VIDF file. All selected data sources must define the same number of scan bins, which is dictated by the binning scheme selected. All selected data sources must define the same number of Scan Units. All selected data sources must define the same number of Data Units. This information is defined within the PIDF file. Note that although the data sources may define the same number of units, there is no guarantee that the same exact unit is being processed for all selected data sources. In other words, while the number of units defined may be the same, the order of the unit definition may vary. The ScanSensor application simply uses the same unit number, not a unit description, when converting the data into units to be displayed for all selected data sources. This unit number is defined by the IDFS data source selected as the "controller".
For the ScanSensor program, the data must be time-rectified; that is, data from all IDFS sources must form an equal time measurement increment. The data for the "controller" IDFS source is acquired first. The time period covered by the data accumulation for the "controller" will dictate the time interval that is to be acquired for all other IDFS sources. For the "non-controller" IDFS sources, data will either need to be retrieved or the previous sample will be held for the current time interval. The percentage of the sample to be included for the current time interval for the "non-controller" IDFS sources must be determined. Based upon where the start time of the sample lies with respect to the start time defined for the time interval being processed, the fraction is either calculated with respect to the top edge (start time) or bottom edge (end time) of the time interval. The fraction should normally be between 0.0 (0%) and 1.0 (100%); however, if a gap was encountered by the "controller", the fractional values for the other data sets could be negative, indicating a time-stamp somewhere before the gap or in the gap region. A fractional value could also be negative if a gap was encountered and if the start time of the data is beyond the end time of the current time interval. If the fraction is negative, the data from that data set are not included in the current iteration of the algorithm. For positive fractional values, the data are multiplied by that fraction and the resulting quantities are accumulated for the current time interval. The fractional value is also saved separately and used to re-normalize the final quantity before it is displayed.
The ScanSensor program can be invoked in one of two modes:
(1) interactive mode or (2) batch mode. In interactive mode, the program
utilizes a GUI-based definition session to define the data parameters to be
presented. The definition phase of the ScanSensor program
has many options so that the user can tailor the displays to meet their
individual needs. Once the definition session has been completed, the selected
data parameters can then be displayed for the selected time range. To invoke
the program in interactive mode, type ScanSensor at the command line.
When the user is accessing the ScanSensor program from within
the SDDAS viewer, the program is always invoked in interactive mode.
In batch mode, the interactive GUI-based definition session is bypassed and
the data requested is immediately displayed based upon information
contained in the named layout file. To invoke the program in batch mode, type
ScanSensor -FName filename at the command line. The argument
filename is the name of the layout file that is to be
utilized during the current display session. Note that the name of the
layout file does not include the .SEN extension. If the named layout file
does not exist, an error is displayed to the screen and processing terminates.
In batch mode, the designated time period for data processing can be modified
by utilizing command line arguments. In addition, batch mode can only be used
for non-interactive graphics devices, which result in the generation of meta
files that can later be printed. If the output device selection contained
in the layout file is an interactive device, an error is displayed to the
screen and processing terminates. However, the output device that is specified
in the layout file can be overridden by specifying the device to be utilized as
an argument on the command line. For a complete list of arguments that can be
utilized in batch mode, the user is referred to the
SDDAS Applications Batch Interface document.
The format that is used for plotting the data is selectable by the user, using a row and column specification. The maximum number of rows is set to ten. The maximum number of columns is set to six. The display area will be partitioned into a row x column plotting area, as defined by the user. The total number of plot boxes defined for the plotting area is equal to the row value times the column value (row x column). The number of plot boxes must be greater than or equal to the number of IDFS data sources selected. If there are more IDFS data sources defined than plot boxes, an error message will be displayed to the user instructing them to modify the page layout. If there are more plot boxes than IDFS data sources defined, the data is displayed, column by column, and the remaining plot boxes are left blank.
The data will be displayed in a ticked and numerically labeled box. Along the top of each box, a heading is displayed. This heading indicates the name of the satellite and the virtual instrument being processed and the spectral quantity being displayed. In addition, a label which specifies the data units being processed is displayed along the top of the color bar, which is displayed along the right-hand side of the plotting area. This label is defaulted, but can be changed by the user. Along the left-hand side of the plotting area, a label is displayed which describes the units along the y-axis. In the upper left-hand corner of the page, TIME is displayed in the format year/day-of-year hours:minutes:seconds.milliseconds. The start time and stop time represents the time interval for the current page being displayed.
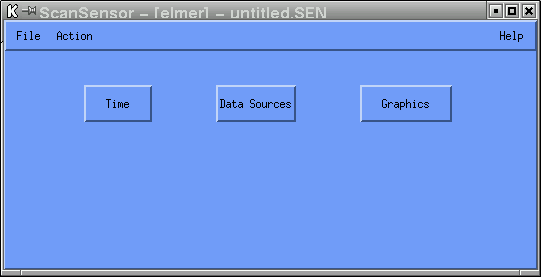
To commence the display of the ScanSensor program, a time range for which the data is to be processed must be specified. The time range can be set by selecting the "Time" button. This action will invoke the Set Time GUI. Next, the IDFS data source(s) must be selected. At least one data source must be defined. This can be achieved by selecting the "Data Sources" button. This action will invoke the Data Sources GUI. On this GUI resides a list which indicates the IDFS data source(s) to be processed. Initially, this list is empty. To add a data source to the list, the pull-down Insertion menu is utilized. Once the position for the data source to be added has been determined, the actual data source must be selected using the IDFS Source GUI. This GUI is automatically invoked when a new item is added to the list. Once a valid IDFS source has been selected, the "Attributes", "Binning", and "Scaling" buttons becomes visible and accessible.
At this point, a plot can be displayed, since all other information is defaulted based upon information found in the PIDF file for the first IDFS source selected. To plot the first page of data, select the pull-down Action menu from the main menubar and select the Draw option. Upon activation, the local database is checked to see if the requested data files are online. If data for the requested time range is not online, the ScanSensor program will ask the user if they wish to retrieve the requested data before the plotting of the data is enacted. If the user answers yes, the data will be promoted to the local disk before an attempt is made to display the data. If the user answers no, the ScanSensor program continues and tries to display the data, and the plot boxes will remain empty for those IDFS data source(s) that are not available for processing.
The plots will be displayed on the output device selected by the user. The default selection is the XWindows device. If the user is accessing the ScanSensor program from within the SDDAS viewer, the plot will be displayed in the box area defined on the grid. If the user is running the ScanSensor program from the command line, the plot will be displayed in an area designated as the output area for the window being utilized. If the output device selected is a bus hard-copy device, the plotting of the data will be done concurrently by another process, with the results being sent to a meta file. To change the output device, the "Graphics" button should be selected. This action will invoke the Graphics GUI. This GUI contains the Output Device option list which allows the user to change the output device. This option list is not displayed when the user is accessing the ScanSensor program from within the SDDAS viewer.
Based upon the time range specified by the user, the ScanSensor program may generate more than one page of data. In order to proceed to the next page of data, the Draw option must be utilized. A full page of data is always displayed to the user for each "Draw" activation. Data will continue to be plotted until the user-requested end time has been reached or until an error condition is raised. When an error condition is encountered, a message is displayed and processing terminates.
Once all the information has been defined, the information may be saved to a layout file for future retrieval. This is achieved by selecting the pull-down File menu from the main menubar and selecting the Save As option. The information defined is not saved by the program unless the user explicitly does so. Note that when providing the name of the layout file, do not specify the .SEN extension. The ScanSensor program automatically appends the .SEN extension to the name of the layout file upon creation of the file.
The remainder of this document gives an in-depth explanation of the options that appear on the various GUIs utilized by the ScanSensor program.
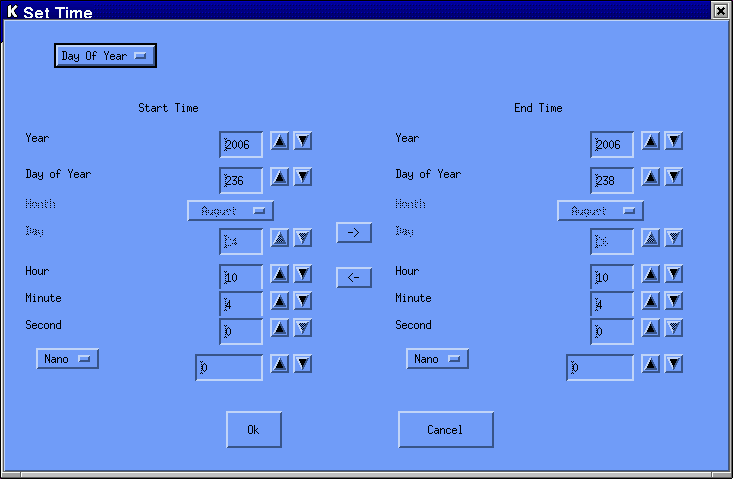
In order to set the time values, enter the values in the boxes that appear next to the time component being set or use the up/down arrows. The stop time must be greater than the start time. The time is initially set to the current time. By Julian convention, January 1 is day 1.
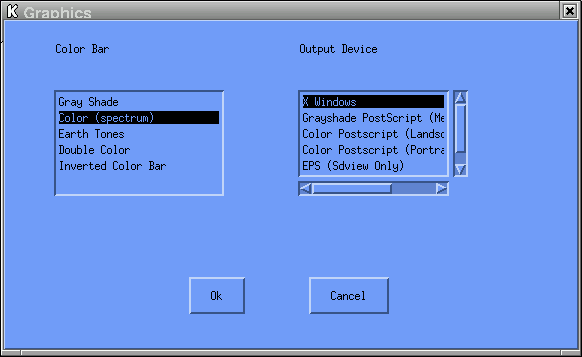
| Value | Color Table |
|---|---|
| Grayshade |  |
| Color |  |
| Earth Tones |  |
| Double Color |  |
| Inverted Color | |
You will notice that the spectrum shown for the Color and Inverted Color options are the same. The difference between these two options deals with the background color. For the Color option, the background color is black and the foreground color is white. For the Inverted Color option, this is reversed - that is, the background color is white and the foreground color is black. This option was added for the use with the hard-copy devices; XWindows treats these two options the same, using black as the background color.

To add a data source to the list, the pull-down Insertion menu is utilized. The menu options indicate the position within the list at which the current data source definition is to be inserted. These options include:
The first two options, After and Before, indicate a position that is relative to the highlighted entry on the list. The new data source definition is either placed after or before the current position on the list, respectively. The last two options, First and Last, indicate an absolute position on the list; that is, the new data source definition is either placed at the beginning of the list or at the end of the list, respectively. Obviously, these options make sense for a non-empty list. Therefore, the first data source definition is always placed at the beginning of the list, regardless of the option selected. The position is utilized when the data is extracted and processed; that is, the data is processed in the order in which it exists on the list. Once the list contains an entry, the Attributes, Binning, and Scaling buttons become visible.
To delete a data source from the list, the pull-down Removal menu is utilized. Currently, this pull-down menu contains just one option
When the "controller" (the first item on the list) is changed, all GUI options are reset based upon information in the PIDF file for the source that is currently defined as the first item on the list and this data source becomes the new "controller".
The Data Item button invokes the IDFS Source GUI. The Attributes button invokes the Data Attributes GUI. The Binning button invokes the Bins GUI. The Scaling button invokes the Scaling GUI.
The following two menu options control the partitioning of the display area:
The display area will be partitioned into a row x column plotting area, as defined by the user. The total number of plot boxes defined for the plotting area is equal to the row value times the column value (row x column). The number of plot boxes must be greater than or equal to the number of IDFS data sources selected. If there are more IDFS data sources defined than plot boxes, an error message will be displayed to the user instructing them to modify the page layout. If there are more plot boxes than IDFS data sources defined, the data is displayed, column by column, and the remaining plot boxes are left blank.
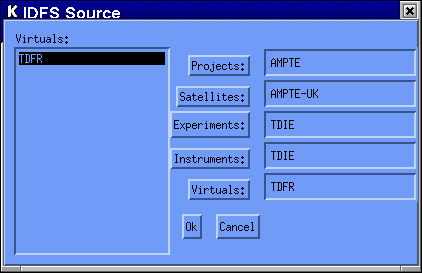
The user must select the project, satellite, experiment, instrument and virtual instrument from which data is to be extracted. To change any of the selected options, click on the buttons on the right hand side. Note that all lineage information under the branch being changed is no longer applicable and must be re-selected. Once the data parameter has been identified, the lineage for the data parameter is displayed on the list in the position selected.
The ScanSensor program does not allow the selection of a scalar IDFS data source for processing since the scan variable is one of the axis to be plotted. If a scalar IDFS data source is selected, an error message is displayed and the Data Sources GUI will remain on the screen until a valid vector data source is selected.

The Infer button is used to default all options based upon information found in the PIDF file for the IDFS data source that is to serve as the "controller".
If the IDFS data source selected uses spacecraft potential data in the conversion of the
values selected for the Data Units and / or the Scan Units
options, this menu option will become visible and may be changed from the default value
of "No" by the user.
Once the IDFS data source that is to serve as the "controller" has been selected, binning information is defaulted based upon information contained in the PIDF file for the selected data source. For the ScanSensor application, all sensors are binned using the same binning scheme; therefore, PIDF sensor zero is used to define the binning scheme that will be used by all sensors. The user need not concern themselves with this information unless a change in binning schemes is desired, which can be achieved by selecting the "Binning" button.

The Infer button is used to default all options based upon information found in the PIDF file for the IDFS data source that is to serve as the "controller". For color bar information, the information retrieved from the PIDF file is based upon the selected Data Unit. For the y-axis information, the information retrieved from the PIDF file is based upon the selected Scan Unit.
Currently, this pull-down menu contains just one option
This option is not presented when the user is accessing the ScanSensor program from within the SDDAS viewer. When this program is invoked from within the viewer, the user should go to the box that contains the ScanSensor plot, click on the right mouse button and select one of the options presented or use the Action button provided by the viewer.